
GET MORE INFO! from my free newsletter
* Tips and tricks you won't find anywhere else * Answers to readers' top questions * Reminders to check your dog fence batteries
Step 1: Planning your dog fence installation
Your first step to installing a do-it-yourself dog fence is planning your installation. I know, I know... planning is tedious. But, at the risk of sounding like your dad, I'll say, "If you fail to plan, you plan to fail!" And with something as important as your dog's life at stake, you want to do everything you can to set yourself up for success.
So, on that serious note, there are four areas you need to consider before you begin your dog fence installation:
- Buying the right invisible dog fence for your dog
- Getting your underground utilities marked
- Getting the right tools to make your installation fast and easy
- Understanding where you want to install your transmitter and wire before you ever pick up a screwdriver or kick a shovel into the ground
Buy the best dog fence for your needs
In my article Which Brand of Invisible Dog Fence Should I Buy?, I provide an in-depth explanation of the features you should look for in a dog fence. Please note that I've successfully used just about every major brand of dog fence to contain even hard-to-train dogs, and I have no personal stake in what brand you ultimately buy. So, while I won't say, "Buy this brand, not that one," I will tell you what features to look for when you shop.
If you'd like a quick guide to the features included in every major dog fence brand, visit my Shopper's Guide for detailed product reviews.
Get your underground utilties marked
Before you put a shovel in the ground, you should call your local utility companies to mark existing underground lines such as cable, telephone, and gas. Accidentally hitting one of these lines during wire installation can lead to expensive repairs or even your own physical harm — you can probably imagine the negative outcome of accidentally hitting a gas main.
Some states have a centralized agency that manages this notification process for you with just one phone call. For example, residents of Central / Northern California and Nevada can call Underground Service Alert at 1-800-227-2600. Texas residents can call DIGTESS at 1-800-344-8377.
Tools you need
To make your installation as easy and efficient as possible, make sure you have the following tools on-hand before you begin:
Required Tools:
- Screws with matching anchors
- Level
- Ruler
- Phillips head screwdriver
- Wire cutter/stripper
- Waterproof wire splices
- Shovel
Optional Tools:
- Hand weeder
- Power drill
- Circular saw
- Mortar
Planning your wire and transmitter install
Installing dog fence wire and a transmitter isn't a particularly complex job, but it is hard work. That said, once you get your transmitter on the wall or your wire in the ground, you don't want to have to move it any time soon (trust me on this). So, consider these things as you plan where to install your hardware:
Transmitter: Your dog fence transmitter requires a dedicated power source, so choose an installation area very close to an outlet that you won't need for another purpose. Also, make sure the outlet is in an area that's well protected from rain and wind. Most likely, you'll want to install your transmitter indoors (e.g. your garage), but, if necessary, you can install it in a waterproof sprinkler control box.
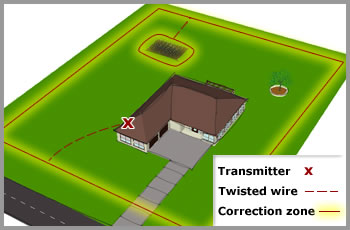
Wire: Start planning your wire installation by drawing a basic diagram of your property. Now, decide which areas you want your pet to access. Do you have flowerbeds, large equipment (like an air conditioning unit), or a pool you want to keep your dog away from? Or is your goal simply to keep your dog in your yard?
Now, consider the boundary signal. The dog fence wire emits a boundary signal in a radius around the wire. While the size of that radius is configurable, you'll ultimately want the entire correction zone to be at least 6 to 8 feet across. So, plan to install your wire several feet outside the areas you want your dog to access.
Remember that the wire must make a complete loop. In other words, you can't end with an unattached wire — the wire must complete a circuit from the transmitter, around the area you wish to protect, and back to the transmitter again. Also, keep in mind that if you install any two lengths of wire too close together, you will cancel the signal each wire emits. That's helpful for running wire in areas you want your dog to access; for example, using twisted wire to connect from your transmitter to your outer boundary. However, you should leave at least 8 feet of space between any two lengths of wire running parallel to each other that are meant to contain your pet.
Did this article answer your question? If not, Google the keyword phrase "installation invisible fence " to learn more:
Next: Installing Your Invisible Dog Fence Wire >>